Android
Prisma Campaigns provides a framework library with a set of controls and classes for the integration with Android using Java. The Library Reference section below explains how to reference the library in your project in more detail.
First steps
The Prisma client library requires the following initialization parameters:
load(String server, String port, String appToken, String customer, String protocol)
where
param String serverandparam String port: server name and port where the Prisma service resides and is listening.param String appToken: access token for the current application.param String customer: customer ID (if available). Otherwise, pass an empty string ("").param String protocol: Connection protocol (https by default). If you need to use http, add the following network access permissions to theAndroidManifest.xmlfile as shown below:
<?xml version="1.0" encoding="utf-8"?>
<manifest xmlns:android="http://schemas.android.com/apk/res/android"
package="com.prismacampaigns.testsdk">

<uses-permission android:name="android.permission.INTERNET"/>
To begin, import the Prisma SDK and invoke the Client.load() static method only once, preferably when the main application activity finishes loading:
import com.prismacampaigns.sdk.*;

public class MainActivity extends AppCompatActivity {

@Override
protected void onCreate(Bundle savedInstanceState) {
...
    Client prisma = Client.load(getApplication(), "server", "443",
                               "22dae0ad-a6a8-4767-80bc-b29098147813",
                               "1234", "https");
...
}
Since the Client class is a singleton, it will return the same instance of the object whenever the application calls it through the shared static attribute as Client.shared.
Embedded banners
To integrate a banner into an Android View and load dynamic content, you can use the Placeholder control as follows:
First, add the control from the Prisma SDK to the activity layout. The example below illustrates how to define and integrate a fixed-size control into an existing placeholder named PHName:
<com.prismacampaigns.sdk.Placeholder
android:id="@+id/PHMain"
android:layout_width="800px"
android:layout_height="600px"
android:visibility="visible"
custom:name="PHName">
</com.prismacampaigns.sdk.Placeholder>
> It is worth noting that you can add as many placeholders as needed in each activity.

Second, synchronize campaigns when creating the view:

```java
public class MainActivity extends AppCompatActivity {

@Override
protected void onCreate(Bundle savedInstanceState) {
    ...
    Placeholder pt = (Placeholder)findViewById(R.id.PHMain);
    Client s = Client.shared;
    List<Placeholder> phs = new LinkedList<Placeholder>();
    phs.add(pt);
    s.syncView(this, phs, null);
    ...
}
In this case, the phs parameter should include the list of placeholders defined as activity outlets, whereas this represents the current activity.
Custom banners
You can also create banners from the application code independently of the SDK. To do this, you can utilize the SyncedHandler of the syncView method. Under this scenario, the OnSynced callback is invoked when requesting the banners for the given page:
s.syncView("androidview", phs, new SyncedHandler() {
@Override
public void OnSynced(Map<String, PlaceholderContent> result) {
    PlaceholderContent content = result.get("PHName");
    if (content != null) {
        Log.i("MainApp", String.format("Total banners found %s", content.banners.size()));
    }
}
});
To retrieve the views from the content of placeholder:
IBanner banner = content.banners.get(0);
View v = banner.getView(pt.getContext());
or the content of an HTML banner:
IBanner banner = content.banners.get(0);
String content = ((HtmlBannerView)banner).getHTMLContent()
To initialize the funnel from a banner:
banner.getFunnel().start(pt.getContext())
or dismiss it:
banner.getFunnel().dismiss()
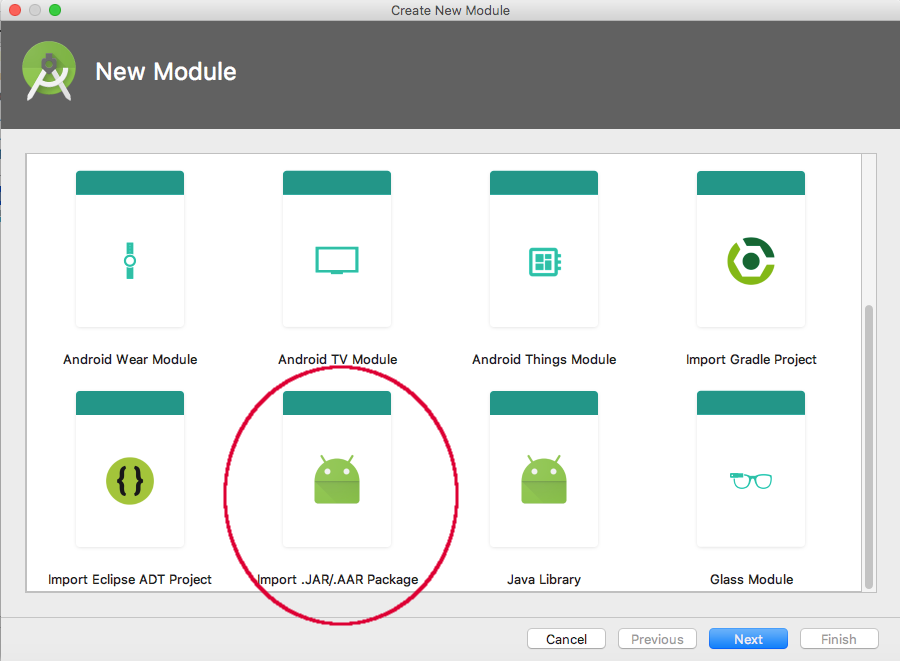
Library reference
First, choose Import .JAR/.AAR Package in Android Studio as shown in the following image:
Second, select app-release.aar:

Next, add a reference to gradle with the corresponding dependencies as follows:
 dependencies {
    ...
    implementation('us.bpsm:edn-java:0.5.0')
    compile project(":prisma-release")
    ...

}
Finally, save the changes and synchronize Gradle.
On this page